Hi, Phoenix here, continuing our discussion on dairy farming. In this blog post, I want to talk about what K and I learned about milking goats, mostly by doing things wrong the first time!
When our goats first had kids (baby goats) and started producing milk, we waited too long to wean the kids and we didn’t separate them. This was a mistake. For obvious reasons, you will not get milk if the kids are with their mothers; don’t even bother trying to milk them at that point. Now, we separate the kids at night after the first week and wean them completely after six weeks (see the previous blog post for details).
In that first season, we also didn’t think we would need a milking stand or milking pump. We thought we could just put a leash on a goat, tie it to a post, and then milk by hand as other brave individuals have done. It turns out hand-milking a goat with its small teats and teat-openings is really tedious! So we got a mechanical hand pump online specifically for goats which didn’t need electricity. A pump, when attached to a container with a tube and attached to teat cups with another tube, creates a vacuum in the container and suction in the teat cups, causing the goats to release milk. The mechanical pump worked great… till it didn’t. After a few months of use, it no longer maintained the vacuum needed to get the milk to flow. This is probably because the original mechanical pump was designed to bleed excess brake fluid and not specifically designed to be used daily to milk goats. There is an internal gasket that wears down over time, meaning the pump will have to be replaced.
We then upgraded to an electric pump with a big container to catch the milk. Remember, we still didn’t have a milking stand at this point. K and I took turns goat-wrangling and fighting with the pump, taking a long time to create a vacuum which was quite frustrating. Alas, we knew we couldn’t dedicate two people and that much time and effort every time we wanted milk.
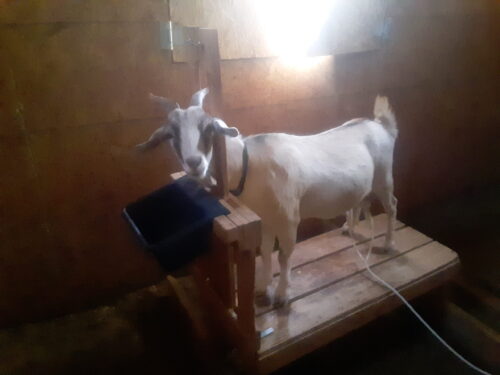
So we got a milk stand with a place to put a bucket of feed and hold the goat’s head in place while being milked. It’s also big enough for me to sit on while milking. These qualities in a milking stand turn out to be pretty important. I am not above bribing goats into cooperation. Sweet feed, also called rolled cob or wet cob, does the trick. It’s grain mixed with a bit of molasses. Unfortunately, goats can only have small amounts (¼ to ½ cup depending on the size of the goat) at a time or they’ll have problems with bloating and diarrhea. We mix in alfalfa pellets to avoid giving them too much.
With the milking stand and electric pump, I’m able to milk the goats by myself in relative peace, except if they run out of feed on the stand. I’ve also found the milking stand convenient for grooming the goats, trimming their hooves (more on this in a later post), and checking for mastitis or other health issues. Once the goats discover sweet feed and get used to the stand, they’re happy to get up there–ours fight each other to be first.
It’s actually more difficult to get them off the stand than on it. You can use their horns for steering them (if the goats aren’t disbudded, meaning horns have been cauterized at an early age to stop growth), but I find it easier to control them with a collar. This is especially useful to get one goat out of the shed and let the next one in.
Speaking of the shed, ideally there should be an area blocked off for milking so that area stays clean. We found ours is too small for that, so we have to dedicate quite a bit of time to keep the area clean. Between keeping the shed, the stand, the pump, the milk bottles, and the goats clean, sanitation is always a struggle, and a necessary one. Without proper sanitation, you could make yourself and your goats sick.
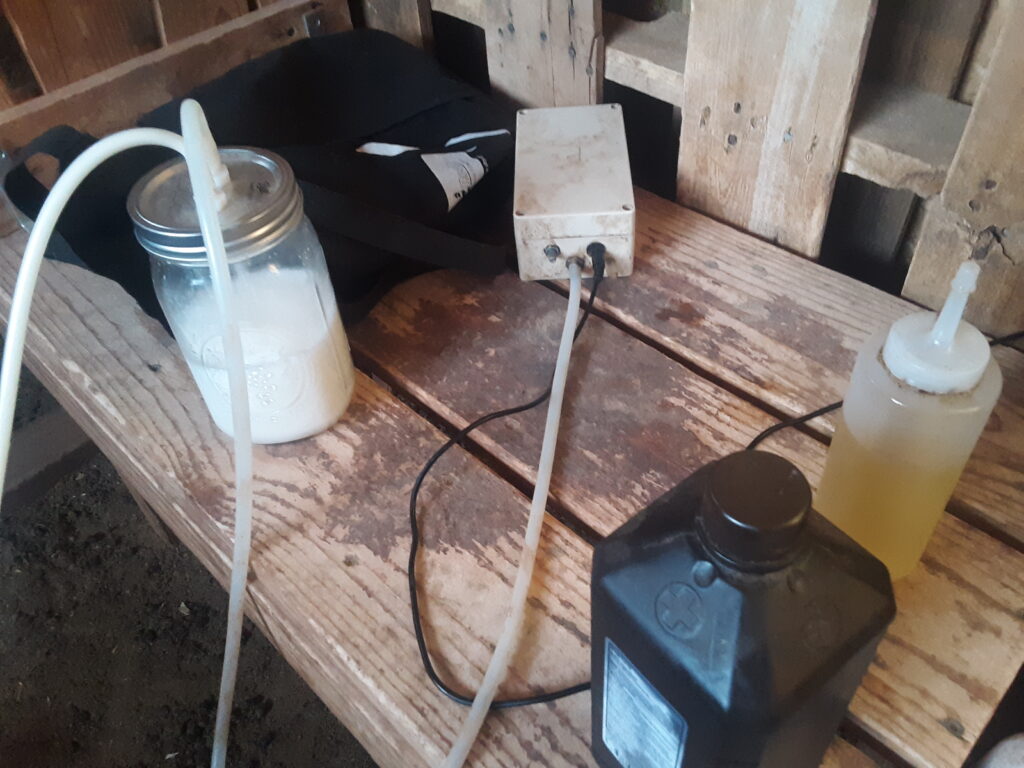
For this, we sweep the shed weekly and sweep the stand before every milking. Once a goat is on the stand, I clean the teats with hydrogen peroxide and apply oil. The oil moisturizes the teats and creates a seal so the teat cups have better suction. The pump transfers milk to a mason jar, which I put in the fridge as soon as possible. I use mason jars because they’re glass and easier to keep clean. After each milking, the milk line and teat cups need to be cleaned. We flush them with water several times and then clean them with hydrogen peroxide. The translucent vacuum line may show milk in it, and if so, would need to be cleaned.
We store the milk for at most a week, skim off the cream that has floated to the top (great for ice cream), and then make cheese or other dairy products. The milk can also be frozen, but should be used immediately after thawing. I prefer to make and freeze the product rather than freezing the milk. We’ll talk about making dairy products in subsequent posts.
Next blog post: Part 4: Dairy Farming–making fresh cheese (by Phoenix)