As part of the effort to become food independent, K and I decided to put up a hoop house in fall 2021. What is a hoop house? You’ve probably seen them in the country-side looking like giant plastic-sheeted tunnels made of arching pvc-pipe or metal. For us to build a hoop house, there were many factors to consider. How would we use it? What would we plant? What type and size of hoop house should we get? Where should we put it? How would we protect it from the wind?
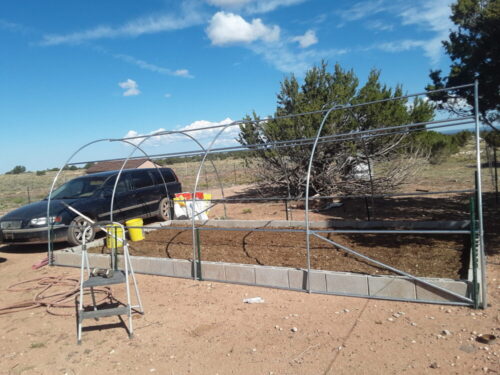
Hoop houses are a cheaper alternative to greenhouses. Initially, we didn’t want to spend the money on a second greenhouse, so we opted instead for a 10’x20’ hoop house with metal framing. To save more money, we kept an eye out for material we already had on-hand from earlier projects on the homestead. The first thing we had to consider when placing the hoop house was proximity to water. We selected an area close to the house, and to the garden with a water barrel. K also suggested we place the hoop house on a relatively bare patch of ground, since hoop houses do not have flooring and we wouldn’t need to weed as much.
Since we most often buy onions and garlic from the grocery store, we wanted to save money by growing more of our own. These vegetables are relatively cold-tolerant and so might do well in a hoop house, as opposed to a more insulated greenhouse. The onion and garlic would need a raised bed because the soil isn’t very fertile, around 4-6 inches. We used 8”x16”x4” interlocking cinder blocks for the raised bed frame. This would last longer and retain more heat than a wood frame. We used some leftover blocks from the first greenhouse build.
We originally thought about making three separate frames, one running along the back of the hoop house for garlic and two running the length of the hoop house for onions. This would leave a 2-ft. walkway so we could water the plants. However, this would require more cinder blocks than we had on-hand and the walkway seemed a bit cramped. In the end, we built one frame to encompass the entire floor of the hoop house, planning to put in stepping stones on top of the dirt as a walkway. We filled the bed with about 5 inches of our compost and old bedding from the goat shed (more on this in a later post). This was back-breaking work but made for really rich soil for the onions and garlic. We decided not to build a pathway through the center because we wouldn’t be able to reach the sides with water. In the end, we created two walkways along the length of the hoop house, about 3 ft. from the sides and 4 ft. in between (see illustration below). We laid the walkway with paving stones recycled from a previous project. We could then reach all areas of the hoop house when watering without getting muddy ourselves. Once the beds were built, we thoroughly soaked the soil before planting the onions and garlic.

We bypassed growing garlic from seed or buying from a garden supplier by buying 20 heads of garlic from the grocery store. Many people don’t realize you can grow plants from produce bought at the grocery store. Although much of the produce is hybridized or treated to prevent germination, some brands of potatoes, garlic, and heirloom tomatoes can be cultivated. Once we had purchased the garlic, we separated the cloves, and planted them about 4 inches apart along the back 4-ft x 10-ft space of the hoop house.
Many onions at the grocery store are treated so they won’t sprout. Even if they do, planting them won’t produce edible bulbs. Most onions are sold in onion sets of around 80 small bulbs, available in garden stores. However, most varieties sold are long-day onions, which means they grow well under 16 to 18 hours of sunlight during the summers. This is fine in parts of the country with long growing-days like in the northeastern US, but not great here in the southwest. These long-day varieties would provide great onion greens, but wouldn’t grow big onion bulbs out here because we get at most 14 hours of sunlight. For the onions we wanted to grow, a spicy short-day variety called red creoles, we needed to start from seed. Since their seeds are so small, we scattered them in the hoop house bed (outside of the area planted with garlic), and then covered the seeds with a thin layer of compost we sieved ourselves and some seed-starting soil we had on-hand from an earlier project. This finely sieved soil layer would ensure good contact with the seeds for better watering.
Now how do we get it to stand up to the wind? Stay tuned.
Next blog post: Part 2: Hoop house adventure- wind-proofing